How Can You Record Your Karaoke Sessions Like a Professional?
Part 1: Essential Recording Equipment
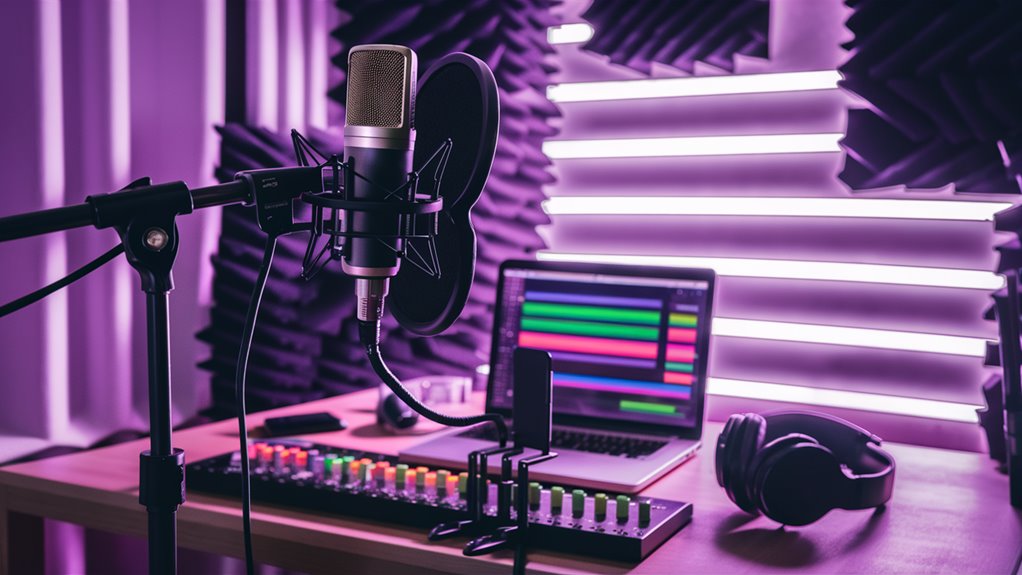
It’s important to start with the right equipment if you want to make professional-sounding karaoke recordings. With XLR connectivity, a high-quality condenser microphone serves as your foundation. Pair it up with an audio interface capable of 24-bit/96kHz processing and a set of closed-back headphones so that you can monitor accurately.
Part 2: Optimal Recording Setup
Microphone placement greatly affects how natural sounding your voice can be captured. Aim to place yourself 6 to 8 inches away from the mic capsule. In addition, angle your head so as not get any plosives or sibilance into that delicate microphone. Set your microphone input gain at between -12dB and -6dB, making sure that peak levels stay below -3dB so that the quality of your recording continues to be immaculate.
Part 3: Room Acoustics and Treatments
Transform your recording room with proper acoustic treatment. Position acoustic panels strategically to control unwanted reflections, add corner bass traps for low frequency build up and you have the ideal environment for professional sounding vocal captures.
Part 4: Enhancement in Post-Production
Use professional audio processing techniques to achieve studio-quality results:
- Compression to control dynamic range
- Equalization to emphasize the voice’s clarity
- Reverb for space and depth
- Downward peak limiting produces overall volume maximizing
These technical data and processing steps will help you achieve broadcast-quality vocals with every karaoke recording you make.
Part 1: Essential Equipment Setup for Recording
Part 2: Essential Equipment Setup for Professional Karaoke
Chapter 3: Essentials of Professional Recording Equipment
When you’re doing professional karaoke recording, you can’t just plug into any old equipment–it’s precision equipment selection and careful setup that make the difference! A high-quality condenser microphone with XLR connectivity and cardioid polar pattern is the best way to get clean-sounding vocals, eliminating all unwanted noise.
With 24-bit/96kHz capabilities, the audio interface guarantees that signal conversion from microphone to digital workstation circuitry remains pristine.
Accessories and Monitoring
Closed-back headphones rated at 250 ohms offer the ultimate isolation necessary for studio monitoring.
Now Essential Accessories:
- Add a pop filter and shock mount to keep away the unwanted plosives and mechanical vibrations.
- Microphone Stand – A professional microphone stand with integrated cable management ensures both stability and clean signal flow.
Digital Environment and Acoustic Treatment
Medium through the Digital Audio Workstation (DAWS) as the hub of all future recordings, can be improved with a dual-screen setup so you see lyrics and parameters side by side and don’t have live monitoring overlap onto recorded tracks.
Acoustic treatment is essential for high quality studio results. Correctly positioned bass traps and absorption paneling stages such as this can vastly increase recording clarity.
Some of the crucial elements for this comprehensive karaoke configuration include:
- Four corner bass traps
- Ceiling cloud treatment
- First-reflection point panels
- Side-wall absorption panels
This comprehensive gear-set yields circular control-room results as good as those heard on any home karaoke machine yet suitable for commercialization or prestige product.
Room Acoustics and Treatment for Karaoke Recording
Room Acoustics and Treatment Fundamentals
Room acoustics and treatment for professional-level karaoke play an integral part in the sound chain. A thorough assessment of the acoustics in your recording environment will reveal which zones suffer what kind of reflections and reverberation.
Strategic Placement of Acoustic Panels
Install acoustic panels at primary reflection points on side walls as well as ceiling surfaces. For best sound absorption, select panels with a minimum 2-in. thickness and an NRC rating north of 0.85.
Place bass traps in the corners of your recording space to control low frequency build-ups and keep vocals clean.
Floor and Mic Area Treatment
Fit the floor zone where you will be making recordings with dense carpeting or specially made acoustic mats. Then pay special attention to the area behind your microphone — install a reflection filter or extra absorption panel.
Noise Isolation Arrangements
In order to create high-quality sound isolation, apply weather stripping to the doors and windows. Use Mass Loaded Vinyl (MLV) barriers to keep out external noise interference.
In this situation there is a deliberate balance of absorption which avoids unwanted reflections but ensures an atmosphere conducive to authentic voice recording.
At the same time, in order to have vocals with professional quality yet also sounding natural, keep the balance between acoustic dampening and natural room sound.
Sound Settings and Levels
How to Set Up Professional Audio to Record Karaoke
Good Level Setting, Gain Control Positioning
This is basic for high-quality karaoke recordings. Adjust your microphone input gain to between -12dB and -6dB on interface meters when singing normally.
Monitor your peak levels carefully. Keep the loudest next karaoke night parts below -3dB if you want to avoid digital clipping. Turn on the phantom power (+48V) for condenser microphones before you record.
Digital Audio Workstation
Make DAW 24-bit/48kHz settings for maximum audio resolution. By setting the buffer size to 128 or 256 samples you can get the best from your machine, then optimize in program latency rates for real-time monitoring.
Obtain a correct monitor mix. For karaoke work a parts-to-vocals ratio of 60/40 is crucial, so that you can follow intonation in playback.

Dynamic Processing and EQ Settings
Set the music’s dynamic compression to have a threshold level of -18dB and the ratio at 4:1.
Turn down carefully on the equalizer at about 200Hz where it sounds muddy, while boosting marginally around 3kHz to give clearer voice production.
Give a final setting to the output levels at -14 LUFS so as not just that but all current European requirements among streaming platforms are met.
Optimizing Your Signal Chain
- Basic Flow of Signals
- What you need to remember with your microphone is good calibration.
- Digital conversion module should be monitored for good quality control.
- Monitor Balance
Microphone Technique for Karaoke
Professional Microphone Technique, Karaoke
Proper microphone handling is crucial to professional level karaoke performance. You’ll want to make sure that the basic elements are right, including an optimal 6-8 inch distance from your mouth to the microphone capsule, to maintain even sound levels throughout your performance.
Positioning and Distance
Use Your Fist as a Reference Distance Guide.
The microphone should be positioned at an angle of 45 degrees, pointed at your mouth with a slight off-center giving orientation in order to lessen your chances for uncontrolled plosives.
Professional Grip and Voice Control
Avoid microphone cupping: it causes unnecessary resonance and potential feedback problems. Instead, hold the microphone body tightly and firmly in hand to transmit sound properly.
Dynamics of Performance
- High notes: Gradually increase distance while vocalizing strongly.
- Soft passages: As you lower microphone distance, try to keep the optimal signal-to-noise ratio up.
- Real-Time Monitoring: Use headphones to judge and adjust your technique for superior sound quality.
Mixing and Post-Production Hints
Professional Mixing and Post Production Hints for Karaoke
Balancing Levels for Optimum Results
Set vocal tracks at -6dB against the musical backing at -12dB for ideal separation of the two.
At 100Hz input a high pass filter to remove any unnecessary sounds while retaining warmth.
Implement de-essing techniques in the 6-8kHz range to control harsh sibilants but while doing so not destroy intelligibility.
Space Expansion and Movement
Change your reverberation settings to a 1.2-1.8 second decay and then have the wet signal levels at 20-30%.
Vocal Compression Settings
- Ratio of 4:1
- Attack time of 20ms
- Threshold of -18 dB
Advanced EQ Treatment
- To help articulate his words better, add 5kHz.
- Needing some polish? A 12 kHz boost may be needed.
- At 300Hz, take out a sloughing, murky part of the sound.
Professional Mastering
With a precision limiter dialed almost full-on and set to leave room for -0.3dB peak, you can now produce an uninterrupted mix.
Export to 44.1kHz/24-bit to retain quality throughout playback on fast karaoke systems.